The Body Shop Haul <3

Hello, beauties!

Today, I’ll be showing you the lovely things I picked up at The Body Shop (AKA the happiest place on earth).  This is one of my favorite stores, so I couldn’t resist buying a few more things than planned… Oops.  Let’s dig right in!

IMG_3876 IMG_3878

I ALWAYS see VelvetGh0st (Gabriella) from YouTube using The Body Shop’s InstaBlur Primer and raving about it.  She convinced me that I needed it in my life and after swatching it on my hand in the store, I had even higher hopes for it!  It blurred all the imperfections on my skin and made my hand SO. SMOOTH.  I can’t wait to give this a go on my face!  The lady at the store also told me it would control any oils, which is a plus!

IMG_3871 (1) IMG_3870

I next picked up their Aloe Calming Facial Cleanser.  I have extremely sensitive skin and have been on the lookout for a new gentle face wash.  I tried this out last night along with their Muslin Cloth, which I also picked up.  So far, I think it’s AMAZING. It will probably deserve a post of it’s own in the future.

IMG_3866 IMG_3863 IMG_3838 (1) \

I constantly have patchy, peeling skin all over my body.  That might be too much information, but we’re all friends here!  I really wanted something to help exfoliate and so I decided to pick up this Body Polisher.  I tried this out today and am loving it!

IMG_3840 (1)\

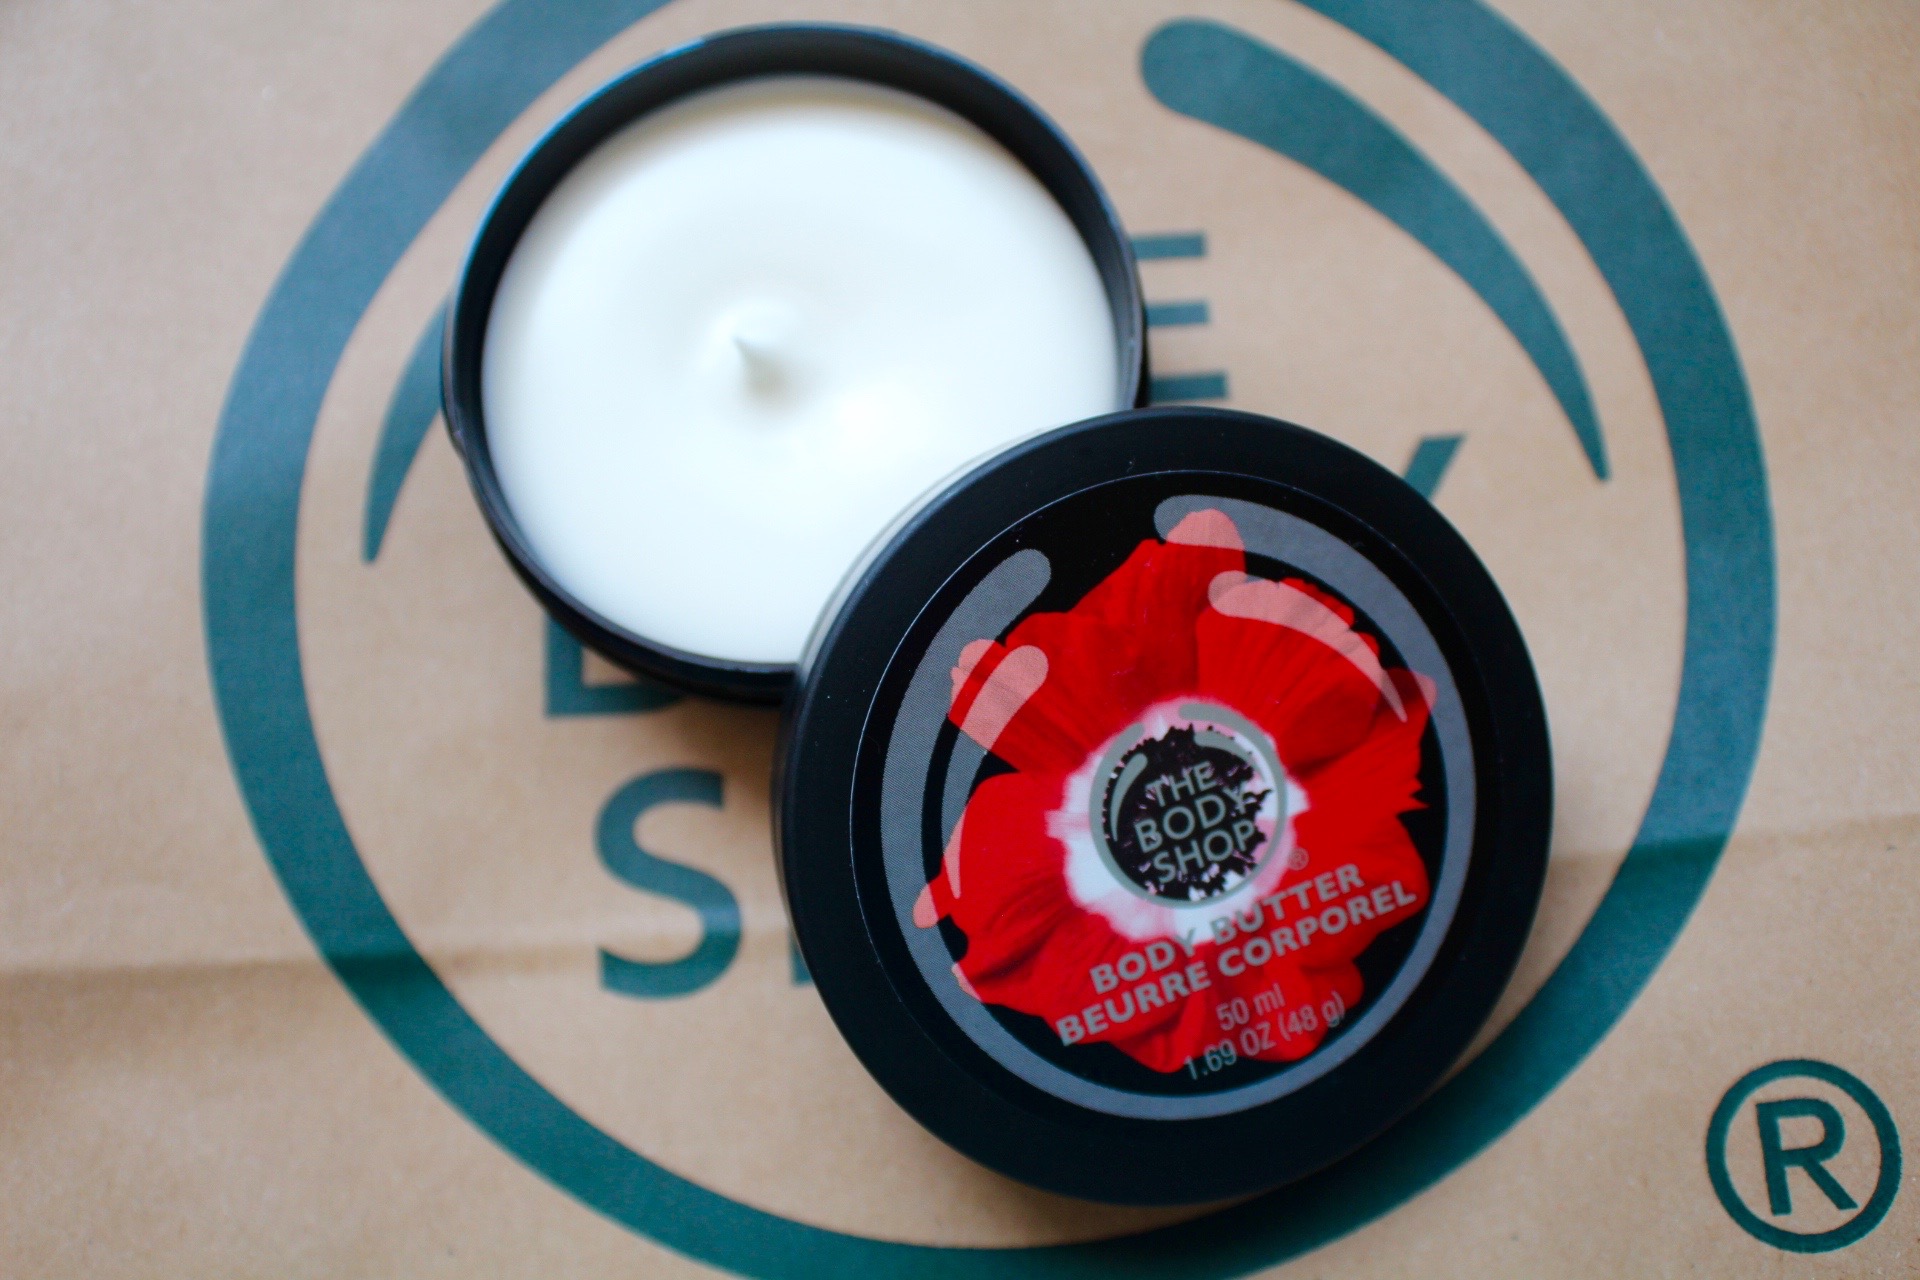
Next, I really wanted something from the Smoky Poppy line, so I picked up their travel size Body Butter and I am really loving this scent!

IMG_3843 (1) IMG_3844 (1) IMG_3845 (1)

I love any type of hydrating product that is sprayable, because I am lazy when it comes to moisturizing and spray bottles just make my life that much easier.  I decided to try out their Wild Argan Radiant Oil.  The scent is nice and not overpowering.  It looks beautiful on the skin and it can be used on the hair and face as well.

IMG_3859 (1)

I also picked up their Coconut Body Milk.  I am in LOVE with this.  It smells amazing and moisturizes my skin so well!

IMG_3833 IMG_3834

Their Shea scent is my absolute favorite, so I picked up their Body Whip.  I love this stuff!  It soaks into the skin super quickly and doesn’t leave me feeling sticky at all!

IMG_3853 IMG_3857

Thanks so much for reading. ❤ I hope you all enjoyed seeing this haul!  What are your favorite products from The Body Shop that I need to try out?

XO,

Hanna


Wanna enter my Mac Lipstick Giveaway?  Feel free to join in on the fun. 🙂


You can find me on social media, too! (That counts as a social life, right?) :

Twitter

Instagram

Pinterest

My Favorite Summer Nail Polish

Hello there!

Today, I’ll be showing you my ABSOLUTE FAVORITE nail polish to wear this Summer: Essie’s “Butler Please”!  I love everything about it, including the name!

I love Essie nail polishes and think that they have wonderful pigmentation.  I don’t usually have trouble with them smudging as they dry quickly, before I have a chance to mess them up (which I somehow always do when I paint my nails). I also find that these polishes don’t chip as quickly as most do -and that’s saying something, because I have a curse that makes every polish chip on my nails within a day!

Although I love all of Essie’s polishes, my favorite has to be “Butler Please”, which is a beautiful, royal blue color.  It’s super vibrant and gorgeous!  I find that darker shades of polish can make my nails look a little short for some reason, but I don’t think that this shade makes them look stubby at all. 🙂

IMG_3718IMG_3711IMG_3713IMG_3716

This polish costs $8.50, but it’s so gorgeous that I think it’s worth it!

Thanks so much for reading!  What’s your favorite polish this Summer? ❤

XO,

Hanna


Wanna enter my Mac Lipstick Giveaway?  Feel free to join in on the fun. 🙂


You can find me on social media, too! (That counts as a social life, right?) :

Twitter

Instagram

Pinterest

3 Editing Apps You Need | How I Edit My Blog Pictures

Hello, lovelies!

Today, I thought I’d share with you the 3 apps that I use to edit pictures for my blog (and other places, too)!  Before I had a camera, these apps made it possible for me to still have decent-looking pictures even with an iPhone.  There are so many apps out there that it’s hard to know which ones are good and which aren’t, nonetheless how to use them!  I hope this is helpful to you!  🙂

By the way, my MAC Lipstick Giveaway is still open if you’d like to enter! ❤

edittt


1. Facetune.

Screen Shot 2015-07-25 at 3.20.15 PM

You may have heard of this one before, but I think it deserves all the rave that it gets.   This app is basically photoshop on your phone except 100000 times easier to use!

I use the “smooth” tool to smooth out any pores or imperfections on up-close eye photos.  Since I have dry, flaky skin, this really helps me!

IMG_1289 IMG_1290-1

I can also use the “patch” tool to cover up anything I don’t want in the picture.

IMG_1291-1 IMG_1292-1

I can give more detail to my lashes or anything in the photo that isn’t quite as in-focus as I would like it to be with the “detail” tool.

IMG_1293-1

There are many other amazing features on this app, but these are the main ones that I use. I try not to over-do the editing on my photos, just touch them up to look a little bit nicer before posting them.

This app costs $1 in the app store, but I think that it is totally worth it for how amazing it can make my pictures look and how easy it is to use!


2.  Afterlight.

Screen Shot 2015-07-25 at 3.20.45 PM

I love using this app for lightening up my photos and giving them more contrast.  I typically use this for Instagram photos, but it’s great for any dark pictures that I want to give a little more life to before posting!

IMG_2650 IMG_1332-1

IMG_3718 (1) IMG_3718

A way to simplify all of the editing steps in this app and make every picture I edit look similar is to use the “fusion” button in the filter section.

IMG_1318

Once you click that button, it records any actions you take -even adding filters!

IMG_1311IMG_1307IMG_1309IMG_1312

Once you’re done, press the “finish” button.  You then have a custom filter to put on every blog picture so that they all look uniform.  This saves me a lot of time!

IMG_1320IMG_1321

I don’t normally use the filters for my blog since I like to have my blog pictures true to the actual color of products, but these are great for Instagram!  My favorites are Mulberry, Coral, Relic, and Bright Fire.

IMG_1315 IMG_1322-1 IMG_1314 IMG_1317

If I want a cool layover on my picture to make it look older and more vintage, I go under the little filmstrip-looking section and select “Dusty”.  You can change the color of the dust from black to white and also change it’s transparency.  If I want a bright look instead, I head into the “Light Leak” section and select which layover I think would look the best.  I can change the placement of the light with the arrows and also have 7 different colors to choose from.

IMG_1323-1 IMG_1328 IMG_1330

If I want to add a border, there are tons of options!  To make this photo fit Instagram, I chose one that makes it square-shaped.

IMG_1344

This app costs $1.00 and is available for Android and iPhones.


3. Photo Collage.

IMG_1346

In order to fit my pictures into my blog’s featured image, I fill up a collage with pictures from my post and click the “Style” button.  I can change the border to the thickness I would like in the “Shape” section.

IMG_1345 IMG_1337 IMG_1338 IMG_1339

Next, I select “Ratio” and choose the dimensions that I want my collage to have.  In order to fit my blog’s featured image, I select 2:1, but for this example collage, I played around with a few different ratios to see what I liked best.

IMG_1341 IMG_1340

You can also add text to your pictures in this app if you like to do that for your blog pictures!  This is the best collage app that I’ve ever tried and the best part is that it’s free!


If you prefer to do your editing on your computer, I really suggest trying out http://www.PicMonkey.com, which is basically PhotoCollage on your computer instead of your phone!  It also includes some photoshop tools!

For an in-depth tutorial on how to use this website, check out Miss Remi Ashten’s video on how she edits her thumbnails for YouTube!  This video is what made me discover this awesome website and her video is very helpful in figuring it all out!  I used this website to make this post’s cover photo and Remi explains everything perfectly!

If you’d like to find some other awesome apps for editing pictures, MakeupByMandy24’s video helped me discover these and a few other great ones!

Thank you so much for reading!  I hope that this post was helpful to you!!  Until next time. ❤

XO,

Hanna


You can find me on social media, too! (That counts as a social life, right?) :

Twitter

Instagram

Pinterest

Naked Smoky Tutorial | Bold Eyes and Bold Lips

Hello, beautiful people:)

I am absolutely obsessed with Urban Decay’s new palette, Naked Smoky!  If you would like to see a full review and swatches of all of the shadows in this palette, I happen to have already done one -how convenient! You can check it out here. 😉

I decided to create a simple, smoky look with winged liner and a bright lip!  My camera loves to focus on my nose in pictures instead of on my eyes, so if anything is slightly out of focus, I apologize!

IMG_0409-1IMG_2122 (1)IMG_2130 (1)IMG_2133 (1)

I started off by applying the shade Combust all over the lid area and up to the brow bone with Sephora’s Crease Brush.  This shade similar to my skin tone so it will not be visible; it will just aid in helping the rest of the shadows blend more easily. Next, I focused Whiskey more on the crease of my eye with the same brush. I’m not fancy enough to switch out brushes for every shade. 🙂

IMG_0403-2Screen Shot 2015-07-18 at 5.02.42 PM

I then used the fluffier end of the brush that comes in the palette to apply dagger along the crease and outer v, deepening up the Whiskey shade that I added previously.

IMG_0404-1Screen Shot 2015-07-18 at 5.02.59 PM

Next, I used the shade Thirteen all over the inner to middle part of my eye lid, inner corner, and brow bone with my Sephora concealer brush to really make my eyes look brighter and make the dark colors pop more.

IMG_0396-2Screen Shot 2015-07-18 at 5.02.42 PM

I used the smaller end of the brush from the palette to smudge Black Market along my upper and lower lash lines.

IMG_0398-2Screen Shot 2015-07-18 at 5.02.59 PM

Lastly, I applied the shade High to my brow bones and inner corners with the same concealer brush for some nice sparkle.

IMG_0399-2Screen Shot 2015-07-18 at 5.03.20 PM

I lined my eyes using Ulta’s black gel liner and a Zoeva’s 317 wing liner brush along with L’oreal’s liquid liner to really flick out the edge and make it super sharp.  I applied Covergirl’s Waterproof Mascara to my upper and lower lashes to blend them with my falsies -Ardell’s Natural 105 Lashes.

IMG_0390-2 IMG_0391-2IMG_2920

IMG_0400-1

I paired this eye look with a bold red lip, because I was feeling extra fancy.  This eye look is so neutral that it would look amazing with any color, including purples and nudes!  I used NARS’ Velvet Matte Lip Pencil in the shade Cruella.  I love the formula and pigmentation of these Lip Pencils -they are matte, but still very creamy and not drying at all!

IMG_0409-1

I hope this tutorial was helpful to you!  Thanks so much for reading!

XO,

Hanna

Maybelline Dream Bronze BB Cream Review!

Hello, everyone!

I recently picked up Maybelline’s Dream Bronze BB Cream from the drugstore since I’ve seen so many people talk about it and I wanted to see what the buzz was for.  I’m drawn in by anything with the promise to make me glowy or bronzed, so I couldn’t resist.

IMG_0002

I have the Medium/Dark shade and it works well on my skin tone since I am tan at the moment.  It looks pretty dark and a little terrifying, I must admit, upon first putting a dab on the back of my hand, but it blends out into a nice, sheer coverage with a glow.  It’s not too sparkly, just enough shimmer to give you a little, natural shine.  I was a little scared that this would turn me into a disco ball, so I’m happy with how it looks on the skin!

IMG_0005 IMG_0006

It also has SPF 20, so it will protect your skin at the same time as it makes you look tan!  Sometimes, products with SPF can bother sensitive skin, but I found that this didn’t break me out or bother me at all.

Using this product on it’s own, all over the face will definitely give you more of a glow.  I think it’s beautiful this way, but I have found that I prefer to mix it with a lotion or my foundation before applying it to make the finish more natural and a little less dewy.

I have also found that this product works great as a bronzer and I love to dab it under my cheekbones, on my temples, and a little on my jawline and nose for a nice JLo-glow. This is a good technique to use with this product especially if you have lighter skin, because it will be much more natural.

If you have oily skin, I don’t highly recommend this product, but I think you could make it work if you mix it in with your lotion or foundation.  I found that this works very well when mixed with my Clinique Dramatically Different Lotion to a create a kind of tinted, glowy moisturizer with a sheer coverage.  I definitely recommend this for dry to normal skin, because it will make your skin look very healthy and tan.  I have extremely sensitive skin and this product does not bother it like other BB creams tend to as they can be drying and cause breakouts.

Overall, I think this is a great product and recommend it if you are looking for something at the drugstore that can make you look like a bronze goddess.  In moderation, this product is great.  On my skin, it doesn’t make me too oily as long as I don’t go overboard with the amount I use.  I found mine at my local drugstore and it costs $8.99.

I hope that this review was helpful to you!  Until next time:)

XO,

Hanna

Naked Smoky Palette Review!

Hello, wonderful humans:)

The other day, something really, really lovely arrived in the mail… the Naked Smoky Palette! I may or may not have done a happy dance for ten minutes straight when it came.  I will now give you my opinion of it along with some swatches of it’s glorious contents.

First off, the packaging is absolutely gorgeous and I’m in love with it.  It feels really sturdy and sleek. This palette doesn’t clasp shut like the Naked 2 and 3 palettes, instead it is magnetic and I LOVE how easily it opens and closes.  The size of the mirror on the inside is perfect, it fills the whole side of the package unlike some of the other slightly smaller mirrors that were included in the past Naked palettes.  Also, the brush that comes with it is pretty amazing.  It is double ended with a smoky smudge brush on one end and a tapered crease brush on the other.  The box that this palette comes in also includes a little booklet with tutorials on four different looks that you can create using Naked Smoky.

IMG_2118 (1) IMG_2120 IMG_2121 IMG_2111IMG_2152

IMG_2130 (1) IMG_2133 (1)Screen Shot 2015-07-14 at 11.44.13 AM

Nine of these shades are brand new and three are exclusive to this palette.

Shades included:

  • High (champagne shimmer w/micro-glitter)
  • Dirtysweet (medium bronze)
  • Radar (metallic taupe w/iridescent micro-glitter)
  • Armor (metallic silver-taupe w/tonal sparkle)
  • Slanted (light metallic gray)
  • Dagger (medium charcoal w/micro-shimmer)
  • Black Market (jet-black satin)
  • Smolder (deep plum-taupe)
  • Password (cool taupe matte)
  • Whiskey (rich brown matte)
  • Combust (soft pink-taupe)
  • Thirteen (light beige satin)

The first four shades are shimmery and look absolutely gorgeous!  They aren’t overly sparkly and don’t have a bunch of glittery fallout when applied like some eyeshadows do.  The next four are a satin finish.  These are the darkest shades in the palette.  I love how easy they are to blend!  The last four are matte shades.  I absolutely love all of these colors!  Thirteen is the most beautiful, bright white that I love to use as a highlight.  The most pigmented shadows are Dirtysweet and Thirteen, which were incredibly easy to swatch on my arm.  All of the shadows felt super creamy and easy to use when I swatched them!

Screen Shot 2015-07-14 at 11.43.31 AM Screen Shot 2015-07-14 at 11.43.46 AM  IMG_2163 IMG_2165 IMG_2166 IMG_2167 IMG_2169

This palette costs $54.  It is available on Urban Decay’s website right now for order, Sephora (online only), and will be available at Ulta in-store on July 16!  Although this palette is pricey, I think it is totally worth it!  This may be my favorite palette they’ve come out with so far!  I love how they included more matte shades and a variety of different finishes.  In other Naked palettes, the shades have been mostly shimmery finishes, so it’s nice to have more satin and matte colors.  Every shade is SUPER blendable -even the darkest colors!  I think this palette is extremely versatile and I am so glad to have it in my collection.  I definitely recommend Naked Smoky, especially if you are looking for a nice, high-quality palette that includes all the shades and finishes that you need.  This palette can create so many beautiful day and night looks.  It has all the necessities from the perfect smoky eye to even a light, daytime look.  Overall, I’d say Urban Decay did an extremely AMAZING job with this palette, because I love it to pieces.  You need this in your life!

I created this look using the Naked Smoky Palette.  All of the shadows were super pigmented and easy to apply and blend!  If y’all would like to see a tutorial on it, I would love to make one!

IMG_8068 IMG_8069

I hope that this review was helpful to you!  Talk to you soon!

XO,

Hanna

DIY Chalkboard Garland!

Hello, Lovelies!

Today, I bring to you another DIY!  I planned this post a very long time ago, so please excuse the Christmas decor and theme throughout this post as we are just getting excited for Spring… Whoops, I procrastinated.  I thought about just not posting this at all, since the pictures are so old, but you know what?  Better late than never.  heh  Life is busy, but I am excited to be posting more on here soon!  This DIY is a chalkboard garland!  What’s great about this is it’s SO versatile.  You can reuse this banner for every occasion, since you can just erase and write whatever you need to for the holiday and it’s SO cute and vintage-y looking. 🙂

Let’s get started!

First, lay out your wooden garland pieces.  (I bought mine from the Target dollar aisle) Make sure to lay down some paper so you don’t turn your entire table into a chalk board… unless of coarse you want to- it would be pretty fun.

IMG_2087IMG_2096

Next, take you brush and begin painting on your chalk board paint. 🙂

IMG_2104IMG_2088

Let it dry for a half hour or longer and add more coats until it looks just how you want it and feel free to paint the other side, too.  I think it looks better when the back side has at least one coat on it, too, because if the pieces get twisted, you won’t see the unpainted side of it.

IMG_2121IMG_2116

Let the paint dry and then string it onto your twine/whatever kind of string your little heart desires.  I found it was helpful to poke the paint out of the holes with a toothpick to make threading easier.

IMG_5477IMG_5476IMG_5481IMG_5490IMG_5484

Now is the fun part, where you get to write on your garland!  Since this was Christmas time, I wrote Merry X-mas, but this would also work for Happy Easter or any other holiday, depending on how many wooden pieces you need for the letters.

IMG_5553IMG_5505IMG_5498IMG_5514

I hope that you all enjoyed reading this post event though the pictures are from two seasons ago.  *Hangs head*  The great thing about this garland is that even though I took these pictures at Christmastime, I can now just rub off Merry X-mas and write Happy Easter, Happy B-day, or anything I need for the occasion! 🙂  Thank you so much for reading and I will talk to you soon!  XOXO

-Hanna